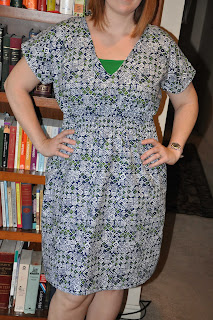
I finally finished a project for myself. Now that I am a mother I tend to dedicate all my crafting time to making cute things for my little guy. I decided it was time to take an evening to make something nice for myself.
I ran across a tutorial for the most flattering shirt dress from Prudent Baby while exploring the world of mommy blogs. It looked cute and the directions sounded easy enough. I would definitely have to say that this is a beginner project.
I've seen several adorable shirred summer dresses for little girls lately, but since I only have a son I wasn't going to be making him any dresses; enter the most flattering shirt dress. I am super happy with how this summer dress turned out. I think this may be my favorite summer dress ever and this was only my first try; I saved my favorite fabric for after I worked out all the kinks (you know, in case I messed up everything horribly and ruined all my fabric).
 I bought this cute navy and green fabric at JoAnn Fabric & Crafts. It was $6.99/yd and I bought two yards. I love that three hours (approximately, I didn't set a timer or anything) and $13 later I have a cute dress that I actually feel good in. Jaime from Prudent Baby says the dress is so flattering because, "V-necks take the attention away from your giant post-baby boobs, and a shirred waist is never too tight and can be placed at your skinniest part (flabby baby belly=hidden." How right she is.
When you reach the point where you're ready to sew up the sides, the directions even point out that you should be careful to stop at the notch you made so you don't sew your armholes closed. This seemed obvious, yet I found myself pinning the sides together from the top down. Thankfully I double-checked my pinning and caught the problem before I had to pick out two long seams. I decided to use a red pin to mark my stopping point just below the armhole while all my other pins were black.
This is the point at which the all your seams are sewn and you try on your "dress" to decide where you want the shirring to go. Jaime from Prudent Baby says it will look like a tent. I felt more like I was wearing a rectangle, but you get the point. The shirring makes this dress. I was ready to go.
I was a little nervous about sewing with the elastic thread since I had never done it before. There are a few tips at the bottom of the tutorial but I also found this super useful information for sewing with elastic thread. I followed the directions given at Creative Heart and everything worked out as it should. I took me a few tries, and half my spool of elastic thread, to get the bobbin tension set correctly, but once I got it the sewing was easy. Initially I had a problem with the elastic thread unwinding a little from the beginning so I taped the starting end to the top of my bobbin; problem solved.
Here's what the shirring looks like on the inside of the dress (they only had black elastic thread but it shows up better for a picture anyway and it doesn't show through the dress).
And what it looks like from the outside. I used navy thread so it blends in well with the pattern. If you look closely you can see the blue pencil line I used to draw my first shirring line. I drew all the way across the front and back of the fabric because I didn't trust myself to sew in a straight line without a guide. The pencil is water soluble so once I wash the dress you'll never know it was there.
Here's the finished product. I love it! I can't wait to make another. I just wish I could nurse in it. Either way, it's super comfortable and it hides everything I currently want to hide. This project is definitely a winner.


4 comments:
LADY!!! it looks fantastic!!!!!!!
It looks fantastic!
That's incredible!!! What does the back look like? You did an awesome job! You should wear it all the time and if it's stretchy you can nurse in it?? Just get one of those hooter-hiders! Have you seen those? I never was brave enough to use them! I have trouble with the tension when using elastic thread too, so thanks for the tutorials!
Jenny
jacked off to the bottom picture
Post a Comment