Monday, November 1, 2010

Happy Halloween!

After weeks of toiling we finally finished our family Halloween costumes just in time to go to an awesome Halloween party Friday night. It's very weird to think that last year my little guy was a part of my costume (in my belly) and that I looked like this:

I was the Earth and the Moon. I had the night view of the Earth on my back.
My husband made my moon out of a big block of Styrofoam. (This was exactly one week before I went into labor.)

This year my little guy got his own awesome costume.

My little baby dragon in action.


I dressed as a knight.


My husband dressed as the castle I was defending from our baby dragon.


The drawbridge really worked.
Damage from the dragon.
I have always enjoyed dressing up for Halloween but it's even more fun now that we have a baby in our lives. I love that I can continue my family tradition of making homemade and unique costumes with my son. I never thought to ask my husband how he felt about making costumes before we got married, since it's not like it would be a deal breaker if he had said no. But, I am super glad that he likes the challenge of making a fabulous homemade costume too and that he has so many wonderful ideas.


Monday, August 23, 2010

DIY Oilcloth Smock/Bib


I'm pretty sure all babies are messy eaters. I haven't conducted a scientific survey or anything, but I've observed a few babies in my time. My little guy needed a better bib; preferably one that covered as much of his clothing as possible. You wouldn't believe (unless you have your own ravenous self-feeder) how much food we find in his lap after a meal. I decided to make a smock-style bib that covers his entire torso, front and back.


I found this awesome oilcloth on clearance at my local Jo-Ann's Fabric superstore. I bought 1/3 yd. so I had a strip 12" wide. I cut it half and then folded one half in half to create the smock/bib. I used an existing bib as a template for my neck hole. I traced the shape on the wrong side of my fabric before cutting it out.


The hole is too small to fit over a baby's head but you want a snug neck opening so bunches of crumbs don't end up running down your messy baby's chin and onto his shirt. After I cut the neck opening I cut one of the shoulders apart along the fold. I attached heavy-duty snaps on the shoulder because my monster boy can pull apart the Velcro on his other bibs.


I added a pocket on the bottom of the front to catch some of the crumby overflow. The great thing about using oilcloth is that you don't have to hem anything. Just cut and sew.


My little guy likes to lift up his bibs now so I needed a way to keep the sides together. I used ribbon ties on this bib, but he pulled so hard that he ripped the ribbons off. This time I sewed black buttons on the back side about half-way down each side using heavy-duty thread. On the front, I sewed on loops of round elastic cord.

Here's the back view.

My little model. He looks like he's wearing a really mod little shirt.
We tried it out at lunch today. Our new bib worked great. My little guy couldn't pull it off and after lunch the pocket was full of bits that would have been all over his pants. And best of all, when I took the bib off his shirt was clean. Well, mostly. He managed to dribble some tomato seeds down his neck folds onto his shirt so I think I'll line the neckline with some terrycloth to catch the random baby moisture.

Thursday, August 19, 2010

Delicious Low-Fat Muffins


I love to bake, but baking isn't very conducive to staying on a diet. I searched all over the interwebs for a low-fat, low-calorie muffin recipe that would actually taste good. I finally found one that worked as a base; after I added a few ingredients these turned out light, fluffy, and delicious. I made a batch of them using some of the raspberries I picked up at the Farmer's Market last weekend. I have also made them with lemon and blueberries (fabulous!). You can get the recipe below.

Delicious Low-Fat Muffins
serving size: 1 muffin, serves 12
calories: 128, carbs: 22, fat: 4

Ingredients (muffin base):
1/2 c. 2% milk
1/4 c. vegetable or canola oil
1 egg, slightly beaten
1 1/2 c. all-purpose flour
1/2 c. granulated sugar
1/4 tsp. salt
1 1/2 tsp. baking powder
1/4 tsp. baking soda
1 tsp. vanilla

Variations:
add 1 c. well-drained fresh or thawed frozen blueberries and 1 tsp. lemon zest
add 1 c. well-drained fresh or thawed frozen raspberries and 1/2 tsp. almond extract
add 1 c. well-drained fresh or thawed frozen cranberries and 1 tsp. orange zest

Directions:
Preheat oven to 375 degrees. Lightly grease a standard muffin tin using a non-stick spray (like Pam) or use silicone muffin cups. In a large bowl, mix together the dry ingredients. In a separate bowl combine milk, vegetable oil, egg, and vanilla (stir gently but do not beat). Add the liquid ingredients to the dry ingredients and stir to combine with a few strokes until just damp. Add the fruit and combine gently until no large pockets of dry ingredients remain (batter will still be lumpy). Fill muffin cups approximately 2/3 full. Bake 20-25 minutes until tops are golden and a toothpick inserted in the centers comes out clean.


I use silicone muffin cups instead of a standard muffin tin. I have a small kitchen and even less room for baking supplies. If you haven't baked using silicone cups or pans, I highly recommend them. My baked goods pop right out of the cups every time, no problem. I just put the cups on a baking sheet lined with aluminum foil (just in case).

Don't those look yummy?

I have some star-shaped muffin cups too. How cute is that little star muffin? I gave it to my little guy. He loved it. I hope you try these out. Do you have any other suggestions for wonderful muffin flavor combinations?

Wednesday, August 18, 2010

Fabulous Fabric Necklace


I ran across this fabric Anthro knockoff necklace over at Flamingo Toes. I knew right away that I wanted to make one for myself. This project was super easy, fast, and cheap. Three words that a busy mommy loves to hear. The original at Anthropologie is $38! Mine cost me approximately $2 and an hour of my time. Doesn't that seem a lot more reasonable?


I bought this fat quarter of fabric on sale for $0.99. I really liked the graphic print with the hint of light gray in the little dots. I have been looking at it for months trying to decide what I wanted to do with it. I decided this necklace might be just the right project for it. I have stopped wearing necklaces since my little guy has taken a liking to yanking on them; I'm afraid I'll be choked or he'll break one. My husband told me that he would be really upset if our little guy choked me to death, breaking my necklace in the process, and then choked himself on the loose beads. Anyway, I figured a fabric necklace is probably beyond his (current) ability to break.

This is how it looked after I added the beads and knotted them into my fabric casing.

I like how the bold pattern became a little softer once it was knotted.

I just used some cheap wooden beads that I bought to use for another project inside my fabric casing. You can get the full tutorial here.

I used my printed fabric, some solid gray cotton, and some silvery-gray tulle to make my little flower. 


The original, and the necklace made at Flamingo Toes had more flowers, but I like it with just the one.


I love finding quick little projects around the web in mommy blogland that I can make and enjoy myself. I really like this new necklace and if you make one for yourself you'll love it too.

Tuesday, August 17, 2010

Argyle Stenciled Bodysuit


A little while back I bought a bunch of plain white bodysuits for my little guy. It's taken a long time to decide what I wanted to do with them. I finally decided to whip up a quick freezer paper stencil using one of my favorite patterns: argyle. I think little boys look so cute in argyle. This is a more classic pattern that the other shirt I did.


I started by designing my pattern. The two horizontal lines mark the extreme points on the bodysuit where the stencil could go. I decided on the length of each diamond and then marked the mid-point of each. That's where I measured for the width of each diamond. All I had to do next was line up my ruler between the points of each vertical and horizontal line and connect them.


After I painted my diamonds, I used the end of the paintbrush handle to draw my dotted lines. I really like the contrast between the bright yellow, navy blue, and avocado green.


In my haste to start painting I forgot to put some freezer paper inside the shirt in case the paint bled. And sure enough, some of the green pain bled through to the back of the bodysuit. To fix the mistake I also painted my stencil on the back, lining up the green diamonds over the bleed through. I really like the back. I guess sometimes mistakes can lead to a better finished product.


I love how this project turned out. I think my little guy looks so cute in his "new" shirt. I have done several stenciling projects using different methods, but this was my first time using freezer paper. If you haven't tried it yet you have to get some. I loved it. It was super easy to iron my stencil in place and I was able to reuse it on the back. It made for nice crisp lines too. Give it a try and see what you can come up with.

This project can also be seen on the Tea Rose Home Link Party.

Saturday, August 14, 2010

I'm losing it...

I'm losing it...in a good way. I (somewhat) recently posted about trying to lose the remainder of my baby weight plus some extra that's been reluctant to leave. Last Sunday it was time to weigh in (after my initial 2lb loss) and time to measure up.

When I stepped on the scale, I was shocked! I actually did a double-take. I lost 4lbs. last week! My waist and hips are down 2" and I lost 1" off my big ol' milk-filled chest. I am so excited about my progress. And to be honest, I'm so proud of myself. I have never stuck with exercise but I do have good self-control and discipline. Maybe it's from the years of modeling good behavior for my students. I am feeling so good though that there's no way I can give up.

I mentioned in my last post about losing weight that I love to cook. I'm a total foodie. So it's been kind of fun, like an adventure, to see what delicious meals I can make that are healthy and low-cal too. Notice I said delicious first. I'm not about to give up taste just to lower the calorie count.


Last night I made some amazing homemade pizza. It definitely wasn't low-calorie but I budgeted for it during the rest of my day since I knew I would be eating the majority of my calories at dinner. It was totally worth it. After a week of hard work (in the gym, chasing after the little guy, and tutoring two students) I felt ready for a little dinner splurge. And even better, today is my dessert day. Last weekend I had coconut-almond gelatto. It was heaven in a cup. I was going to take a picture of it but I couldn't wait to eat it. I'm still trying to decide what I want to have today.

DIY easy headband makeover


I'm sure you've seen all the headband tutorials and posts out there in blogland lately. They are becoming super popular. I think there are so many tutorials in part because if you're the least bit crafty it can be difficult to rationalize spending money on something you could easily make yourself. I decided to make myself a few cute headbands to see how I could incorporate all the ideas I've seen lately.


I started with a cheap set of Goody gals pastel headbands (they were around $3 for 5 headbands) I got at Target. Each headband is 1/2" wide.


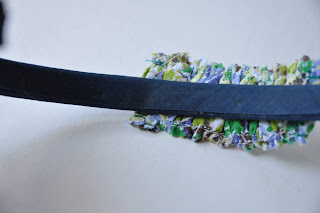
I wasn't crazy about the pastel colors so I used some navy double-fold bias tape that I had leftover from another project to cover the headband I was working on. I partially unfolded the tape before I began gluing it to the headband with Fabri-tac fabric glue. The widest part of the bias tape was exactly 1/2". I glued that to the top of the headband and then folded over the short unfolded side and glued it to the bottom.


By leaving the other side folded I had a nice finished edge to glue down that covered up everything perfectly.


Since I liked the versatility of the navy so much I decided to make my embellishment interchangeable. I added some heat and bond Velcro to both the headband and my ruffle. You're supposed to iron the Velcro from the back but I couldn't iron through the thickness of the headband. Instead, I covered the Velcro with a dish towel and ironed through that right onto the loop part. It worked out just fine. I ironed the Velcro on the ruffle from the other side like I was supposed to.


I used a scrap of fabric that I had left after taking in a shirt that is now too big (yay!). I cut a rectangle and then pinked each of the long sides so that I could leave them raw. I basted along each of my pinked edges and gathered the threads at the same time to make my little ruffle. I like that it has some nice texture and dimension without being a big puff on top of my head. Once I was happy with the size of the ruffle I sewed along my basting stitches and pulled them out. To finish the ruffle I folded each end under and glued it in place and then added the Velcro mentioned above.  The longest part of this project was waiting for the glue to dry.

Tip: I have a bunch of tiny clothespins that I got at a party supply store in the baby shower aisle. They are fabulous for holding all sorts of small things together with just a little pressure while glue dries. I used them to hold down my bias tape while it dried and my husband uses them when he's doing paper crafts.

It's really quite difficult to take a decent picture of the top of your own head.
Overall, I'm very happy with how this little project turned out. I like the idea of using a headband as more of an accessory rather than a utility object, like a rubber band for a ponytail. Now I just have to think of four more ways to dress up those others I have lying around.

Friday, August 6, 2010

Quinoa and black bean salad


I recently talked about how I'm trying to lose my remaining baby weight, and then some, to be in better shape. I know I'm definitely not alone in this goal. You'd think that it would be super easy to eat healthy food while you're at home all day with your children. To the contrary, I actually find it harder to find time to eat lunch now than I did when I worked full-time teaching, or in an office. At least then I had a scheduled lunch break where all I had to do was eat. Or run errands. Or in the case of teaching, grade papers. But you know what I mean. Now all my time is wrapped up in making sure my baby is fed, happy, (relatively) clean, and not eating microscopic bits off the carpet, or pulling things down onto his cute little head.

I was inspired by some recent posts about tasty recipes over at Alisa Burke (ok, when I tried to find the post to link to I realized my version of recent is almost 2 months ago!) to try and find something I would be willing to eat for lunch day after day. I love food and I love to cook. I don't like to eat the same thing over and over though (except for breakfast, oddly). When I was at Whole Foods the other day picking up some beautiful tuna steaks (yum!) for a salad I grabbed one of their prepared meals that I thought would be healthy for lunch, their Quinoa and Black Bean Salad. I was starving and it was time to get the baby home for his afternoon nap. I couldn't even contemplate taking the time after all that to make food before I could eat it, and I'm definitely not wasting my daily calories on fast food (not anymore, anyway).

By reading the ingredients off the back of the container I pieced together my own recipe and it is delicious, and filling. Even better, it's pretty good for my diet healthy lifestyle.


Quinoa and Black Bean Salad
serving size: 1 cup, servings per batch: approximately 7
Nutritional information per serving: 244 calories, 31g carbs, 22g fat, 8g protein  

Ingredients:
1 c. Quinoa
1 can black beans (drained and rinsed)
2 ears corn (cook and remove kernels from cobs)
1 c. red onions (diced)
2 c. red pepper (diced)
1/4 c. parsley (finely chopped)
3 cloves garlic (finely chopped or grated)
1/4 c. (loosely packed) fresh basil (finely chopped)
1/3 c. red wine vinegar
1/4 c. extra-virgin olive oil
 salt and pepper

Cook the quinoa according to the package directions. When the quinoa is finished cooking transfer it to a large bowl and add the remaining ingredients. Mix well. Season with salt and pepper to taste. Enjoy!

I hope you enjoy this dish as much as my family did. Even our nearly-9-month-old loved it. Seriously, is that weird?

Sunday, August 1, 2010

Losing that baby weight


Last month I joined our local rec center. Initially I joined it for the pool. My little guy loves to splash and kick in the water. He's definitely a total water baby. Several people asked me if he could swim already because he spent half the time on his tummy kicking his legs and waving his arms around in what looked like a clumsy doggy paddle while I helped him float. He just can't get enough of it.

Anyway, the center is literally five minutes from our house and it's way cheaper than joining a gym. We have a stationary bike at home but I hate using it. I used to bike for real (until I got hit by a truck) so sitting in one place feels weird to me. I have been using the elliptical trainer at the rec center gym and I love it. I love that it uses more than just the muscles in my legs. I only got a 30-day membership since I wasn't sure how much I'd actually go. Exercise has never really been my thing. But now that I've had a baby I've got some extra weight I'd rather not keep as a souvenir any longer. I'd also like to be able to set a good example for my son as he grows.

A few days ago I read a post from Katie at Notes from a very red kitchen where she mentioned her recently weight loss success. She has another blog that talked about using MyFitnessPal.com. I checked it out and was immediately interested. I signed up (for free) and began logging my daily food intake and exercise.


In the last five days I have lost 2 pounds! Yeah, that's right, 2 whole pounds! I have lost about 4 1/2 lbs. since I started exercising at the rec center a month ago. Using a food journal definitely helps me. I have a vicious sweet tooth so it helps me to see on the screen just how many calories I have consumed in day. Now I'm only having dessert or a sweet treat once a week. Since it's only once a week I'm going to hold out for something really good. When I'm working really hard to exercise it seems like a total waste to eat a candy bar when I could wait for my treat day and have something really wonderful, like a pastry from here. I really love this place.

(If you live in Utah you really have to try it. It's amazing. They have the best pastries I've had since I was in Paris on my honeymoon.)

Anyway, here is what my exercise log looks like from this week. I haven't worked out today yet, but I will. I will have almost burned a whole day's worth of calories. Seeing my progress in print, along with the scale, is totally motivating me.

                                                Minutes                     Calories Burned
Daily Total/Goal                           0/30                              0/200
Weekly Total/Goal                    117/90                          1129/600

How are you staying motivated to lose some baby weight, or just feel better in general?

Notes: Here are two websites that I have found for finding the calorie count of all sorts of foods that don't come with a nutritional information label:  http://www.calories-nutrition.buddyslim.com, and http://nutritiondata.self.com/.

Wednesday, July 28, 2010

Coo-coo baby doll


I love making my little guy toys. I enjoy sewing and crocheting them. I really got into crocheting amigurumi while I was pregnant with him last summer. I designed this doll when he was about 3 months old. He was starting to hold on to things but most of the stuffed animals we had were too big for him to really enjoy. I wanted a toy that was soft, had some high-contrast colors, was easy for little baby hands to hold, and something that was the right size to chew on. This fun little rattle doll was crocheted with acrylic yarn so that it can be washed and dried.


The hands and feet of my little doll were just the right size for my little guy to chew. At nearly 9 months old he still loves to drool all over them.


I added some polka dots in the colors of the arms and legs to the body for some added contrast and texture. Since I sewed the dots on after the body was constructed they are slightly raised.


I originally named him Cuckoo Bananapants because he was just a crazy-looking little doll I thought my son might enjoy. He loves to grab Coo-coo by the hair and bang him around.


Here's a rainbow version I designed for a friend's baby shower. He was a big hit. Each of them are stuffed with poly-fill and the body contains a rattle noisemaker for some added baby fun.


We love Coo-coo and I hope you do too. It's so satisfying and heart-warming to watch your baby playing with the things you make for him with love. What have you made your baby that he loves?

I'm excited to share this little guy on the Tea Rose Home Link Party. See you there.